.png?width=131&height=58&name=image%20(40).png "Kimball Midwest Slant Logo")

You already know everything you need to know about hydraulic hoses since you undoubtedly read last week's blog post "Hydraulic Hose: What You Need to Know". Now, you are ready to learn about hose fittings and adapters.
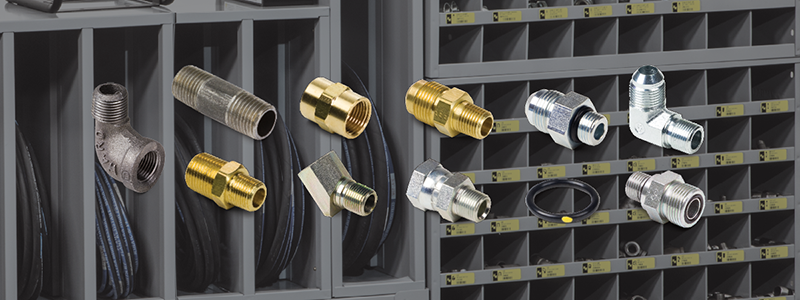
There are several types of adapters, but each of them has specific, important guidelines to follow when it comes to tightening.
Male Pipe Hose Ends
Male pipe hose ends are still regularly found on fittings of all types. Pipe thread is 100+-year-old technology, and frankly, not much has changed in terms of that. Pipe thread is unique; it is a tapered thread that both holds the fitting in place and creates the seal. But pipe threads are not the best choice for high-pressure hydraulic connections as they are susceptible to vibration. An O-ring seal connection method is preferred for high-pressure applications.Tightening: The use of a pipe sealant/lubricant is always a good idea. There are many tapes and pastes available to aid in assembly and sealing. Do not overapply the paste or tape to where it will enter the fluid system and contaminate or clog filters. Tape should be wrapped 1 1/2 to 2 turns clockwise on the male pipe end. Tapered pipe ends are best tightened according to the Turns From Finger Tight (T.F.F.T.) method. In this procedure, tighten the connector into the port finger tight. Next, wrench tighten the connector to the appropriate T.F.F.T. values as shown below.
| Tapered pipe of the following sizes should be tightened 2 - 3 Turns From Finger Tight
|
Tapered pipe of the following sizes should be tightened 1.5 - 2.5 Turns From Finger Tight
|
JIC (SAE) 37-Degree Flare Female Swivels
JIC (SAE) 37-degree flare female swivels are the most popular hose fitting style in the U.S. The seat in the female swivel is tapered at a 37-degree angle to match the 37-degree “bullet nose” on the male connection end.Tightening: Most leaks on this connection are due to lack of tightening or human error. It is best to tighten JIC Female Swivel Nuts by rotating the nut a specific number of hex flats past hand tight according to the chart below. Use a permanent marker to draw a line connecting the swivel nut and the adapter once hand tight. Then tighten the swivel nut the prescribed distance. The misaligned markings will indicate the fitting has been tightened and by what distance.
| Size (inches) | Rotate No. of Hex Flats |
| 1/4 | 1 1/2 - 1 3/4 |
| 5/16 | 1 - 1 1/2 |
| 3/8 | 1 - 1 1/2 |
| 1/2 | 1 1/4 - 1 3/4 |
| 5/8 | 1 1/4 - 1 3/4 |
| 3/4 | 1 - 1 1/2 |
| 1 | 3/4 - 1 |
| 1 1/4 | 1/2 - 3/4 |
| 1 1/2 | 1/2 - 3/4 |
| 2 | 3/4 |
Male JIC Hose Ends
Male JIC hose ends are not nearly as popular as the female swivel; however, the JIC steel adapters are the most commonly found in many applications. The 37-degree flare on the male and female ends provide a steel-to-steel seal.Male and Female Flat Face Connections
Male and female flat face connections are growing rapidly in popularity in many industries as the style is recognized for its leak-free performance. The O-ring embedded in the end of the male thread seats on a flat ridge of steel inside the female end. This fitting style has excellent vibration resistance.Tightening: Proper assembly of flat face O-ring seal connections is based on specific torque values applied to the particular size of fitting as shown in the table below.
| Flat Face O-Ring Size (inches) | Swivel Nut Torque (lbf∙ft) |
| 1/4 | 10 - 12 |
| 3/8 | 18 - 20 |
| 1/2 | 32 - 35 |
| 5/8 | 46 - 50 |
| 3/4 | 65 - 70 |
| 1 | 92 - 100 |
| 1 1/4 | 125 - 140 |
| 1 1/2 | 150 - 165 |
Straight Thread O-Ring (Boss) End
Straight thread O-ring (boss) ends with male pipe represent the two primary port connections in the U.S. The straight threads hold the fitting securely in place while the O-ring seals at the port. The port is machined with a taper or countersink to provide a seat (land) for the seal. The use of straight thread O-ring ports in place of pipe threads helps eliminate hydraulic leakage.Tightening: Prior to assembly, be sure to lubricate the O-ring to prevent O-ring damage or an improper seal. The table below shows the recommended torque values for the SAE straight thread O-ring connections.
| SAE Straight Thread O-Ring Size (inches) | Rec'd Torque (lbf∙ft) |
| 1/4 | 13 - 15 |
| 5/16 | 14 - 15 |
| 3/8 | 23 - 24 |
| 1/2 | 40 - 43 |
| 5/8 | 43 - 48 |
| 3/4 | 68 - 75 |
| 1 | 112 - 123 |
| 1 1/4 | 146 - 161 |
| 1 1/2 | 154 - 170 |
| 2 | 218 - 240 |
Split Flange Fittings
Split flange fittings are a non-threaded fitting connection. The SAE 4-bolt split flange is a face seal style. The flange head that contains an O-ring must fit squarely against the mating surface and be held there with even tension on all bolts.Tightening:
- Lubricate O-ring.
- Position flange and clamp halves.
- Place lock washers on bolts and insert through clamp halves.
- Hand tighten bolts.
- Torque bolts in a diagonal sequence in small increments to the torque levels listed in the table below.
| Flange Size (inches) | Bolt Size (SAE) | Rec'd Torque (lbf∙ft) |
| 1/2 | 5/16 - 18 | 17 - 19 |
| 3/4 | 3/8 - 16 | 25 - 29 |
| 1 | 3/8 - 16 | 31 - 35 |
| 1 1/4 | 7/16 - 14 | 41 - 46 |
| 1 1/2 | 1/2 - 13 | 52 - 58 |
| 2 | 1/2 - 13 | 60 - 66 |
Field Attachable (Reusable) Hose Ends
Field attachable (reusable) hose ends are not used frequently today as they are more difficult to assemble and more costly than permanent crimp fittings. They do, however, offer certain advantages over the crimp-on hose ends. As the name indicates, field attachable fittings can be anywhere – no special assembly equipment is required. This means the user can go to the field to complete the repair, rather than bringing the equipment to the shop. For smaller users, the field attachable ends can be a relatively low-cost option compared to purchasing a crimper or visiting the local hose shop. Additionally, you can get the repair done when you need to.Proper Assembly:
- Place the socket/shell in a vise (if available).
- Screw the hose into the socket – the left-hand threads in the socket require you to screw the hose in counterclockwise.
- Bottom-out the hose into the socket.
- Then turn the hose ½-to-1-turn clockwise. This opens the hose inner tube to allow easier entry of the threaded insert.
- Lubricate the threads of the insert and thread it into the socket until the two pieces are flush together.
With options abounding and a true ability to do it yourself, we can help you save costs and 


